Camera Angles for AI Video: 8 Types and How to Prompt Them
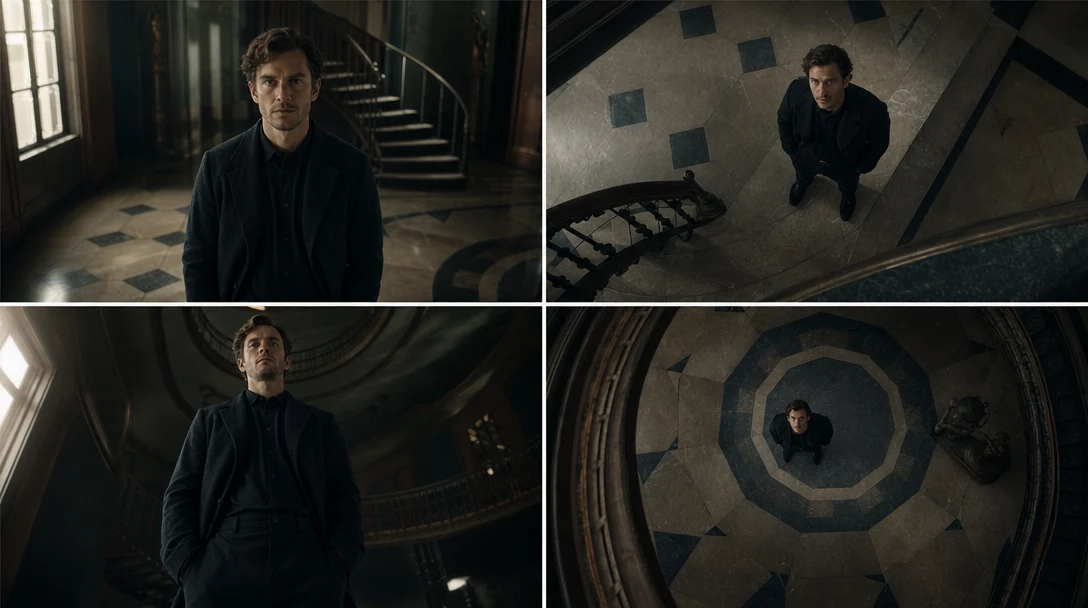
Camera angles for AI video prompts tell the model where the viewer should see a scene from. A low viewpoint can make a person or product feel imposing; a view from above can reveal a layout that a straight-on shot would hide. For a clearer result, pair the angle with a shot size, one subject action, and a camera move.
This guide covers eight common camera angles and viewpoints, explains how they differ from shot sizes and camera movements, and shows how to use them in text-to-video and image-to-video prompts. The prompt examples are starting points, not verified outputs from a specific video model.
Camera Angle, Shot Size, and Camera Movement
These terms describe different parts of a shot. The camera angle or viewpoint says where the camera is and where it looks. Shot size says how much of the subject and setting appears. Camera movement says how the camera changes position or direction during the clip.
| Direction | What it describes | Examples |
|---|---|---|
| Camera angle or viewpoint | Camera position and viewing direction | Eye-level, high angle, low angle, overhead |
| Shot size | How much of the subject or scene is in frame | Wide shot, medium shot, close-up |
| Camera movement | How the camera travels or turns | Pan, tilt, tracking shot, push-in, pull-back |
Combine the instructions when needed: “A low-angle close-up with a slow push-in” specifies a viewpoint, framing, and movement. “Cinematic shot” leaves those choices open.
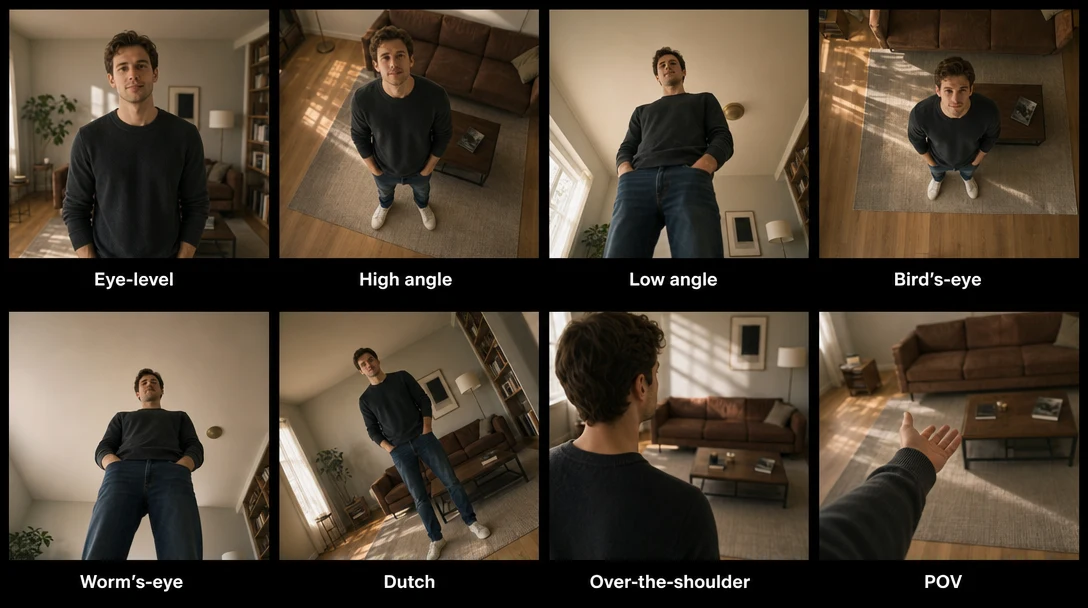
8 Common Camera Angles and Viewpoints
An angle does not create one fixed emotion. Its effect depends on the subject, action, distance, lighting, and scene. Treat the following uses as options to try, not rules.
| Angle or viewpoint | Camera position | Useful when |
|---|---|---|
| Eye-level | Around the subject’s eye height | You want a direct, balanced view |
| High angle | Above the subject, looking down | The setting or arrangement matters |
| Low angle | Below the subject, looking up | Height or scale is important |
| Bird’s-eye view | Almost directly overhead | You want to show a layout or movement pattern |
| Worm’s-eye view | Near the ground, looking steeply up | You want to exaggerate vertical scale |
| Dutch angle | Camera rolled so the horizon is tilted | A deliberately off-balance frame serves the scene |
| Over-the-shoulder | Behind one subject, looking toward another | The viewer needs to follow a conversation or attention |
| Point-of-view (POV) | From a character’s apparent line of sight | You want to place the viewer inside an action |
Eye-level
The camera looks at the subject from roughly the same height. Try it for a presenter, a conversational scene, or a product shown from a natural viewing height.
Eye-level medium shot of a baker setting a loaf of bread on a counter. Keep the camera steady as warm morning light comes through the window.
High angle
The camera is above the subject and points down. A shallow angle can reveal more of an object; a steeper one can make the layout easier to read.
High-angle medium shot of a designer arranging color swatches on a desk. Keep the hands and samples in frame as two swatches move to the center.
Low angle
The camera looks up from below the subject. Use it when height, scale, or a strong silhouette matters.
Low-angle close-up of a red running shoe landing on a track. Keep the shoe sharp against the stadium lights.
Bird’s-eye view
The camera points almost straight down. This differs from a general high angle, which looks down without being directly overhead. Try a bird’s-eye view for food, desk layouts, packaging, or movement across a floor.
Bird’s-eye view of a bowl of noodles on a table. A hand places chopsticks beside the bowl; keep the camera fixed overhead.
Worm’s-eye view
The camera is close to the ground and points sharply upward. This can exaggerate height and distort nearby objects, so make the subject’s distance and position clear.
Worm’s-eye view from pavement level as a cyclist rides past, with buildings rising behind them. Keep the camera near the ground.
Dutch angle
Also called a canted angle, this rolls the camera so vertical lines and the horizon appear diagonal. Use it when the tilted frame has a clear purpose.
Medium Dutch-angle shot of a detective entering a dim hallway. Keep the horizon tilted as a flickering light reveals an open door.
Over-the-shoulder
The camera looks past one person’s shoulder toward another person or an object. The foreground helps establish where the viewer is positioned.
Over-the-shoulder shot from behind a customer as a shop owner presents a small camera across the counter. Keep both people in their established positions.
Point-of-view (POV)
A POV shot shows what a character appears to see. Identify whose viewpoint it is and what enters the frame.
First-person POV as a hiker pushes aside pine branches and sees a lake through the trees. Hands enter the lower edge of frame as the camera moves forward at a walking pace.
Choose a Shot Size to Match the Angle
Shot size changes how much of the subject appears without changing the viewpoint.
| Shot size | What appears in frame | Common use |
|---|---|---|
| Extreme wide shot | A large environment; the subject may be small | Establishing a place or showing scale |
| Wide shot | The full subject and much of the setting | Showing movement and spatial relationships |
| Medium shot | Often the subject from around the waist or chest up | Conversation, gestures, demonstrations |
| Close-up | A face, product, or object fills more of the frame | Expression, materials, detail |
| Extreme close-up | A small feature fills the frame | A label, eye, texture, or precise action |
A low-angle wide shot can show a runner against a stadium; a low-angle close-up can focus on the shoe and track. The viewpoint remains low while the framing changes.
Choose an Angle for the Scene’s Purpose
Start with what the viewer needs to notice. Show more of the setting when it explains the action; move closer when an expression or detail matters.
- Product reveal: Try a low-angle medium shot for scale or an eye-level close-up for shape and finish.
- How-to or process: Try a high angle or bird’s-eye view when viewers need to follow hands and objects.
- Character introduction: Try eye-level for a direct introduction or low-angle for a more imposing entrance.
- Conversation: Use over-the-shoulder framing to show who is listening and speaking.
- Discovery: Try POV to place the viewer inside the action.
- Tension: Use a Dutch angle only when the imbalance supports the scene.
These are starting points. Lens, distance, performance, lighting, and model behavior can change the result. Compare a small number of variations when the intended mood is uncertain.
Pair an Angle With Camera Movement
An angle describes the viewpoint; movement describes how it changes. Keep the instructions distinct and avoid incompatible directions.
- Low angle + push-in: Move closer from below as a character enters or a product becomes the focus.
- Eye-level tracking: Follow a person while keeping the camera around their height.
- Bird’s-eye pull-back: Start overhead, then move upward to reveal more of a layout.
- Eye-level pan: Keep the camera in place while turning across a room or display.
“Keep the camera fixed” conflicts with “orbit around the subject” for one continuous shot. Choose one camera path and describe the subject’s action separately.
A Prompt Structure for AI Video
Use this as a starting structure, then remove details that do not affect the shot:
Shot size + camera angle + subject and action + camera movement + setting and lighting + continuity details
For text-to-video, describe the scene as well as the camera. For image-to-video, the input image already establishes much of the composition; focus on the motion and details that must remain recognizable. Generator behavior varies, so these prompts are starting points rather than guaranteed instructions.
Text-to-video example
Wide low-angle shot of a skateboarder rolling toward a concrete ramp at sunset. Track beside the skateboard at ground level, then tilt up as the rider reaches the top. Keep the rider centered and traveling in the same direction.
Image-to-video example
Use the uploaded portrait as the starting frame. Keep the person’s face, clothing, and background recognizable. Begin at eye level in a medium shot, then make a slow push-in as the person turns toward a window. Keep the movement smooth and continuous.
Use one main angle and one main movement per short clip. If a sequence needs several viewpoints, describe separate shots and their order.
Use Camera Angle Prompts in VisionKey
VisionKey's website describes video creation from text prompts and existing photos. Start with the input that fits your project, then make the camera instruction specific:
- Choose a text prompt for a scene built from a description, or an image if the composition should begin from a supplied still.
- Pick one angle and one shot size, such as “low-angle medium shot.”
- Describe the subject’s action and one camera path, or state that the camera stays still.
- Generate a clip and check whether the viewpoint, movement, and subject continuity match the intention.
- Revise one instruction at a time so it is easier to tell which change affected the result.
AI video generation interprets prompts; it may not reproduce a shot list exactly. If a result misses the intended view, simplify the prompt and make the most important camera instruction explicit.
Common Prompting Mistakes
Using “cinematic” as the camera direction
“Cinematic” may suggest a style, but it does not say where the camera is or how it moves. Name the angle and framing first.
Mixing angle, shot size, and movement
“Close-up” describes framing; “pan” describes movement. State each choice separately.
Giving conflicting instructions
“Static camera” and “slow orbit” conflict in one continuous shot. Remove one direction or split the action into shots.
Changing viewpoint without a reason
Abrupt changes can make it difficult to follow the subject. Give each new view a purpose, such as revealing a detail or reaction.
Treating emotional effects as fixed
A low angle does not always make a subject powerful, and a high angle does not always make them vulnerable. Judge the result in context.
Frequently Asked Questions
What are common camera angles?
Common angles and viewpoints include eye-level, high angle, low angle, bird’s-eye, worm’s-eye, Dutch angle, over-the-shoulder, and point-of-view. Naming conventions can vary, especially where camera position and viewpoint are grouped together.
What is the difference between a high-angle and bird’s-eye shot?
A high-angle shot looks down from above. A bird’s-eye shot looks almost straight down and often presents the scene as a layout.
What is the difference between a low-angle and worm’s-eye shot?
Both look upward. A worm’s-eye view begins near the ground and points steeply up; a low-angle shot can be only slightly below the subject.
How do I add camera angles to an AI video prompt?
Name the shot size and viewpoint, describe the subject’s action, then say whether the camera moves. For example: “Eye-level medium shot of a person opening a door; the camera stays fixed as they step inside.”
Which camera angle should I use?
Choose based on what the viewer needs to notice. Eye-level is a useful starting point for direct scenes, overhead views show layouts, low angles emphasize height, and close framing draws attention to expressions or details. Try alternatives when the intended mood is uncertain.
Give Every Shot a Point of View
Camera angles help decide what the viewer sees and how close they feel to the action. Choose the viewpoint for a reason, pair it with a shot size, and describe movement as a separate instruction. Then try the prompt in VisionKey AI Video and refine the direction that matters most.